For Harley-Davidson enthusiasts, understanding the intricacies of their motorcycle's electrical system is crucial for ensuring optimal performance and safety. The wiring diagram of a 2002 Harley-Davidson model is particularly important, as it outlines the connections and pathways of the electrical components that power the bike. In this article, we will delve into the detailed wiring diagram of a 2002 Harley-Davidson, providing a comprehensive guide for those looking to troubleshoot or modify their motorcycle's electrical system.
Wiring Diagram 2002 Harley-Davidson - A Key to Unlocking Your Motorcycle's Potential. The wiring diagram of a 2002 Harley-Davidson model is a complex network of wires, circuits, and components that work together to power the bike's various systems. By understanding this diagram, riders can diagnose and fix electrical issues, upgrade their motorcycle's features, and even customize its performance. In the following sections, we will explore the wiring diagram in detail, highlighting key components and providing step-by-step instructions for navigating the electrical system of a 2002 Harley-Davidson motorcycle.
what is a wiring diagram and why is it important for a harley davidson
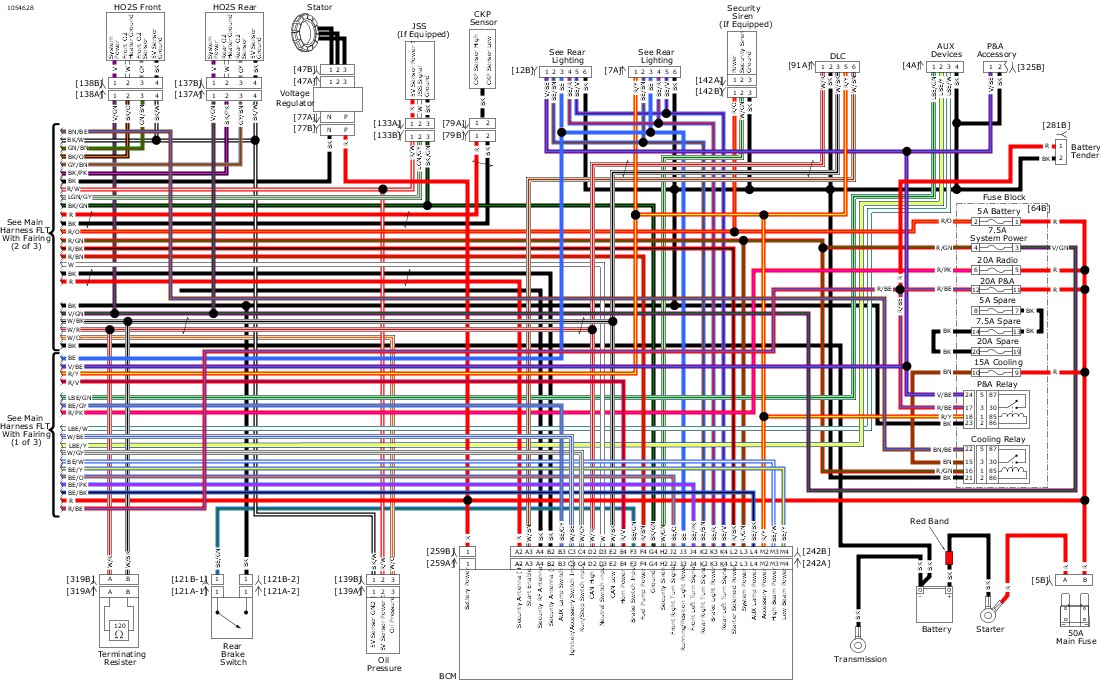 A wiring diagram is a visual representation of the electrical system of a Harley-Davidson motorcycle, showing the connections and pathways of the electrical components that power the bike. This diagram is crucial for Harley-Davidson enthusiasts because it provides a detailed overview of the complex network of wires, circuits, and components that work together to ensure the optimal performance and safety of the motorcycle.
The wiring diagram is important for several reasons:
Troubleshooting: When a problem arises, the wiring diagram helps diagnose and fix electrical issues by simplifying the location of the problem within a specific system or circuit.
Customization and Upgrade: Understanding the wiring diagram allows riders to upgrade or modify their motorcycle's electrical system, enhancing its performance and functionality.
Maintenance and Repair: Accurate knowledge of the wiring diagram ensures that maintenance and repair tasks are performed correctly, preventing potential damage to the electrical system and ensuring the overall reliability of the motorcycle.
Safety: A well-understood wiring diagram is essential for ensuring the safety of the rider and other road users. It helps prevent electrical malfunctions that could lead to accidents or injuries.
In summary, a wiring diagram is a vital tool for Harley-Davidson enthusiasts, providing a comprehensive understanding of the electrical system that is essential for troubleshooting, customization, maintenance, and ensuring the safety of the motorcycle.
A wiring diagram is a visual representation of the electrical system of a Harley-Davidson motorcycle, showing the connections and pathways of the electrical components that power the bike. This diagram is crucial for Harley-Davidson enthusiasts because it provides a detailed overview of the complex network of wires, circuits, and components that work together to ensure the optimal performance and safety of the motorcycle.
The wiring diagram is important for several reasons:
Troubleshooting: When a problem arises, the wiring diagram helps diagnose and fix electrical issues by simplifying the location of the problem within a specific system or circuit.
Customization and Upgrade: Understanding the wiring diagram allows riders to upgrade or modify their motorcycle's electrical system, enhancing its performance and functionality.
Maintenance and Repair: Accurate knowledge of the wiring diagram ensures that maintenance and repair tasks are performed correctly, preventing potential damage to the electrical system and ensuring the overall reliability of the motorcycle.
Safety: A well-understood wiring diagram is essential for ensuring the safety of the rider and other road users. It helps prevent electrical malfunctions that could lead to accidents or injuries.
In summary, a wiring diagram is a vital tool for Harley-Davidson enthusiasts, providing a comprehensive understanding of the electrical system that is essential for troubleshooting, customization, maintenance, and ensuring the safety of the motorcycle.where can i find a wiring diagram for my specific harley davidson model
 To find a wiring diagram for your specific Harley-Davidson model, you can follow these steps:
Visit the Harley-Davidson Service Information Portal (SIP): The SIP is the official source for Harley-Davidson technical information, including wiring diagrams. You can access it through the Harley-Davidson website or by searching for "Harley-Davidson Service Information Portal" online.
Identify Your Model: Determine the specific model of your Harley-Davidson motorcycle by checking the VIN (Vehicle Identification Number) or the model name and year. This information is crucial for accessing the correct wiring diagram.
Search for Your Model: Once you have identified your model, search for it within the SIP. You can filter the results by model year, model name, or other relevant criteria.
Access the Wiring Diagrams: Once you have located your model, you will be able to access the wiring diagrams specific to that model. These diagrams are categorized by system or circuit and provide detailed information about the electrical components and wiring configurations.
Consult the Diagrams and Troubleshooting Guides: Use the wiring diagrams to troubleshoot and diagnose electrical issues with your Harley-Davidson motorcycle. The diagrams are designed to help you locate problems within specific systems or circuits, making it easier to perform repairs and maintenance.
Remember to always consult the Harley-Davidson Service Information Portal for the most accurate and up-to-date wiring diagrams and troubleshooting guides for your specific model.
To find a wiring diagram for your specific Harley-Davidson model, you can follow these steps:
Visit the Harley-Davidson Service Information Portal (SIP): The SIP is the official source for Harley-Davidson technical information, including wiring diagrams. You can access it through the Harley-Davidson website or by searching for "Harley-Davidson Service Information Portal" online.
Identify Your Model: Determine the specific model of your Harley-Davidson motorcycle by checking the VIN (Vehicle Identification Number) or the model name and year. This information is crucial for accessing the correct wiring diagram.
Search for Your Model: Once you have identified your model, search for it within the SIP. You can filter the results by model year, model name, or other relevant criteria.
Access the Wiring Diagrams: Once you have located your model, you will be able to access the wiring diagrams specific to that model. These diagrams are categorized by system or circuit and provide detailed information about the electrical components and wiring configurations.
Consult the Diagrams and Troubleshooting Guides: Use the wiring diagrams to troubleshoot and diagnose electrical issues with your Harley-Davidson motorcycle. The diagrams are designed to help you locate problems within specific systems or circuits, making it easier to perform repairs and maintenance.
Remember to always consult the Harley-Davidson Service Information Portal for the most accurate and up-to-date wiring diagrams and troubleshooting guides for your specific model.how to identify the specific circuits in a harley davidson wiring diagram
To identify the specific circuits in a Harley-Davidson wiring diagram, follow these steps: Access the Wiring Diagram: Start by accessing the wiring diagram for your specific Harley-Davidson model. This can be done through the Harley-Davidson Service Information Portal (SIP) or by consulting a Harley-Davidson service manual. Understand the Diagram Structure: Familiarize yourself with the structure of the wiring diagram. It typically includes a table of contents that categorizes the diagrams by system or circuit. Each diagram is labeled with a specific title that indicates the system or circuit it represents. Check the Diagram Title: When looking at a specific diagram, always refer to the title to determine what system or circuit it represents. This title will indicate whether the diagram shows an entire system or a specific circuit within that system. Circuit Specific Diagrams: Circuit specific diagrams only show the components and wiring in the system(s) listed in the diagram title. These diagrams are designed to help troubleshoot and diagnose problems within specific circuits or systems. Harness Part Numbers: Some wiring diagrams may include harness part numbers. These numbers are for reference purposes only and should not be used for ordering wire harnesses. Always refer to the parts catalog for accurate part numbers when ordering. By following these steps, you can effectively identify the specific circuits in a Harley-Davidson wiring diagram, which is crucial for troubleshooting and maintaining your motorcycle's electrical system. #EANF#As you conclude your exploration of the Wiring Diagram 2002 Harley-Davidson, we hope you have gained valuable insights into the intricacies of your motorcycle's electrical system. Understanding the wiring diagram is crucial for ensuring optimal performance and safety of your Harley-Davidson, and we are confident that this article has provided you with a comprehensive guide to navigating the complex network of wires and circuits. Whether you are a seasoned mechanic or a novice rider, the information presented here will help you troubleshoot and diagnose electrical issues, upgrade your motorcycle's features, and even customize its performance. Remember, a well-understood wiring diagram is essential for ensuring the safety of both you and other road users.
Before you leave, we would like to emphasize the importance of consulting the Wiring Diagram 2002 Harley-Davidson whenever you encounter an electrical issue or need to make modifications to your motorcycle's electrical system. This diagram is a powerful tool that can help you unlock the full potential of your Harley-Davidson, and we encourage you to refer to it regularly as you continue to explore and learn about your motorcycle. Whether you are looking to upgrade your bike's performance or simply want to ensure its electrical system is functioning properly, the wiring diagram is an indispensable resource that will serve you well. Thank you for visiting our blog, and we hope you will continue to find valuable information and insights here in the future.


No comments:
Post a Comment